App Installation :

  • Go to Shopify apps store.
  • Click on the "Add app" button given on the app page and follow the steps.
  • Approve and Install the app, App is free to install.

How to Create a Checkout Upsell

You can add up to 5 offers for each page type: Checkout, Customer Order Status, and Thank You.
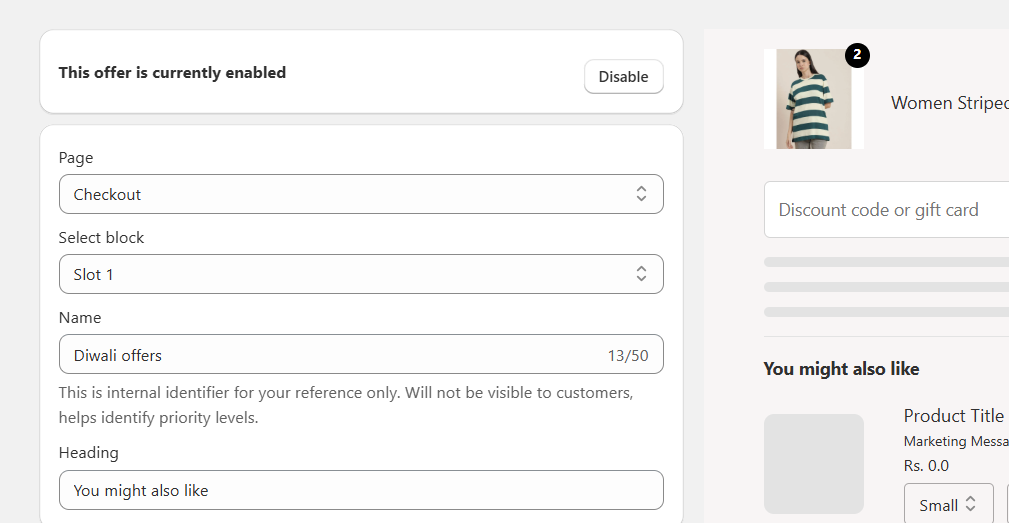
  • Go to App → Checkout Offers Create Upsell.
  • Enable and select a page and block. Each block can be added only once per page — for example, if you use Slot 1 on the checkout page, you cannot add it again.
  • Add a Name. This is for internal reference only and will not be visible to customers.
  • Add a Heading in your preferred language. This heading will be displayed at the top of the upsell offers.

Manual product selection

You can add up to 8 products by clicking the Add product button.
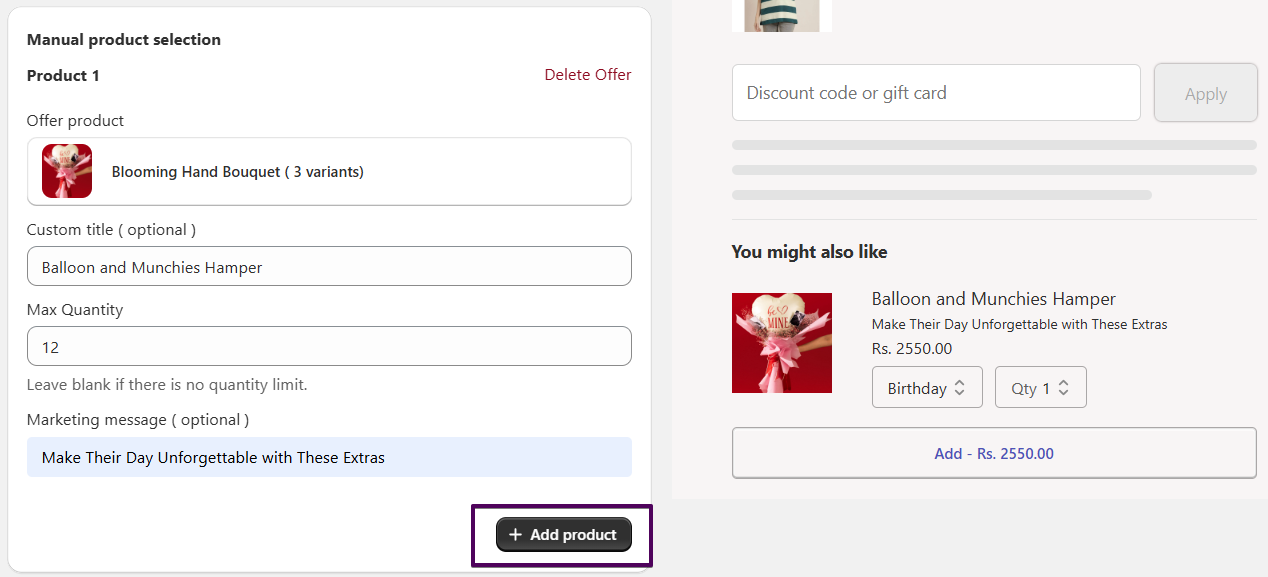
  • Select product – Choose the product you want to offer.
  • Custom title (optional) – Add a custom title to display instead of the default product title.
  • Max quantity – Set the maximum quantity a customer can purchase for this offer.
  • Marketing message (optional) – Add a short promotional message to encourage purchases.
  • Click Add product again to include more products in the offer.

How to add rule

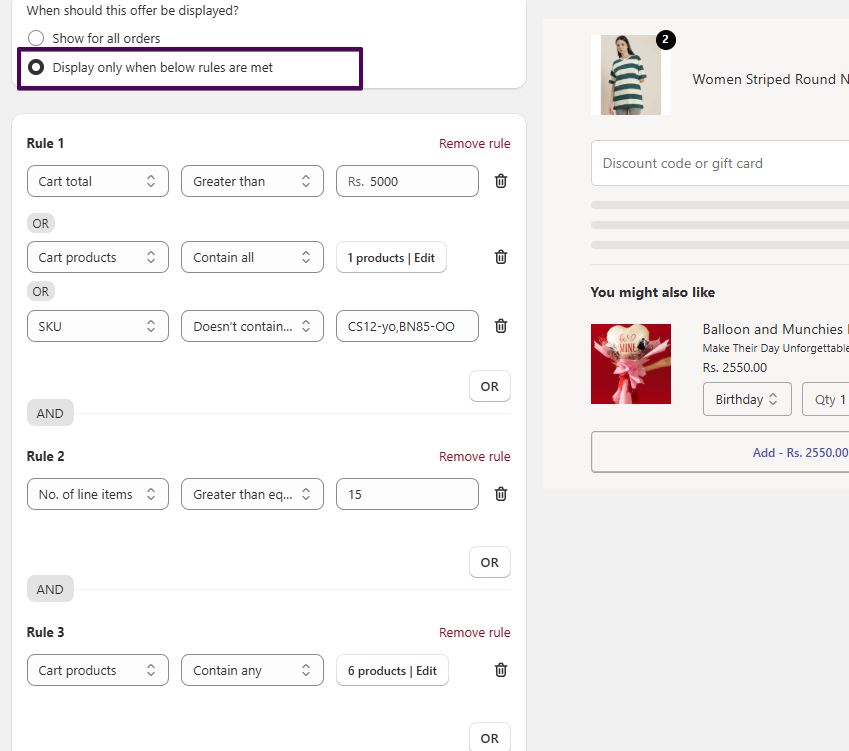
You can create multiple rules to control when the offer is displayed.

  • What rules do: Rules decide when your offer will be shown to customers based on the conditions you set.
  • Multiple rules: You can create more than one rule.
    • All rules are connected with AND logic — this means every rule must be true for the offer to display.
  • Conditions inside a rule: Each rule can have one or more conditions.
    • Conditions inside the same rule use OR logic — only one of them needs to be true for that rule to pass.
  • Add Condition button — Adds another condition to the same rule (OR logic). Example:
    • Condition 1: Cart total > ₹500
    • Condition 2: SKU = ABC123
    • This means: “Cart total > ₹500 OR SKU = ABC123”
  • Add Rule button — Creates a completely new rule (AND logic). Example:
    • Rule 1: Cart total > ₹500
    • Rule 2: No. of line items ≥ 2
    • This means: “Cart total > ₹500 AND No. of line items ≥ 2”
  • Available condition types:
    • Cart total — Match based on the total value of the cart.
    • No. of line items — Match based on the total number of different items in the cart.
    • Cart products — Match specific product(s) in the customer’s cart.
    • SKU — Match by product SKU. You can enter more than one SKU separated by commas (e.g., ABC123,XYZ456).
  • Tip for advanced targeting: You can mix AND and OR for more control. Example: “Cart total > ₹500 AND (SKU = ABC123 OR SKU = XYZ456)” means the offer shows only if the cart total is over ₹500 and at least one of the listed SKUs is in the cart.
Offer Rule Setup Example

How to Add Upsell Offers from the Theme Editor

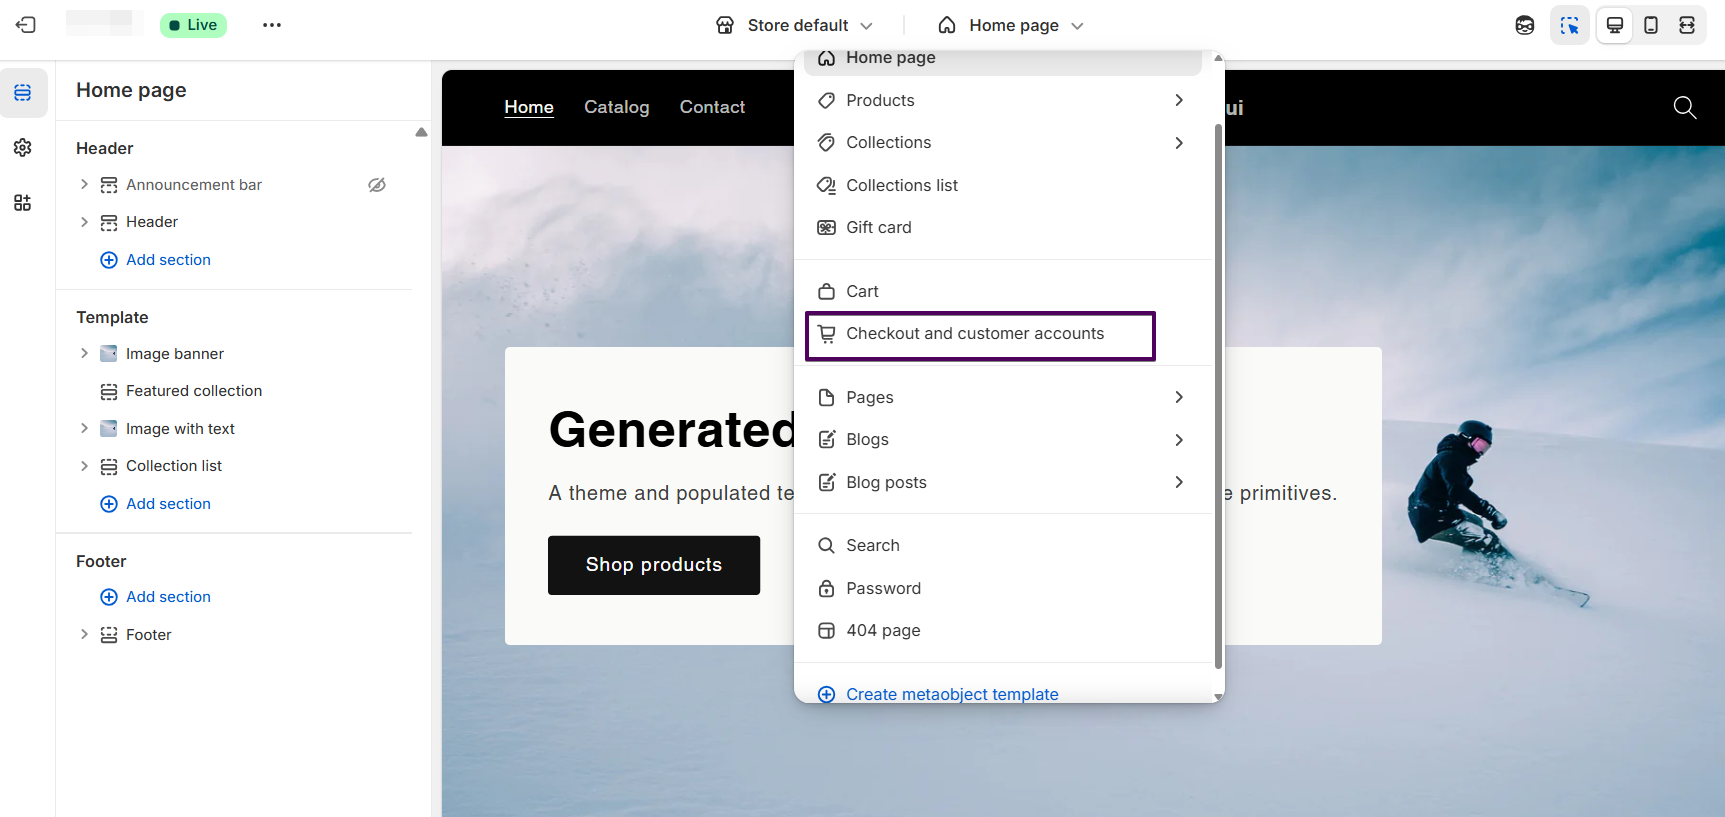
  • Open your Shopify Theme Editor.
  • Navigate to Checkout and Customer Accounts.
Offer added from theme editor

Editor Settings for Checkout Page

Note: This feature is available only for Shopify Plus stores.

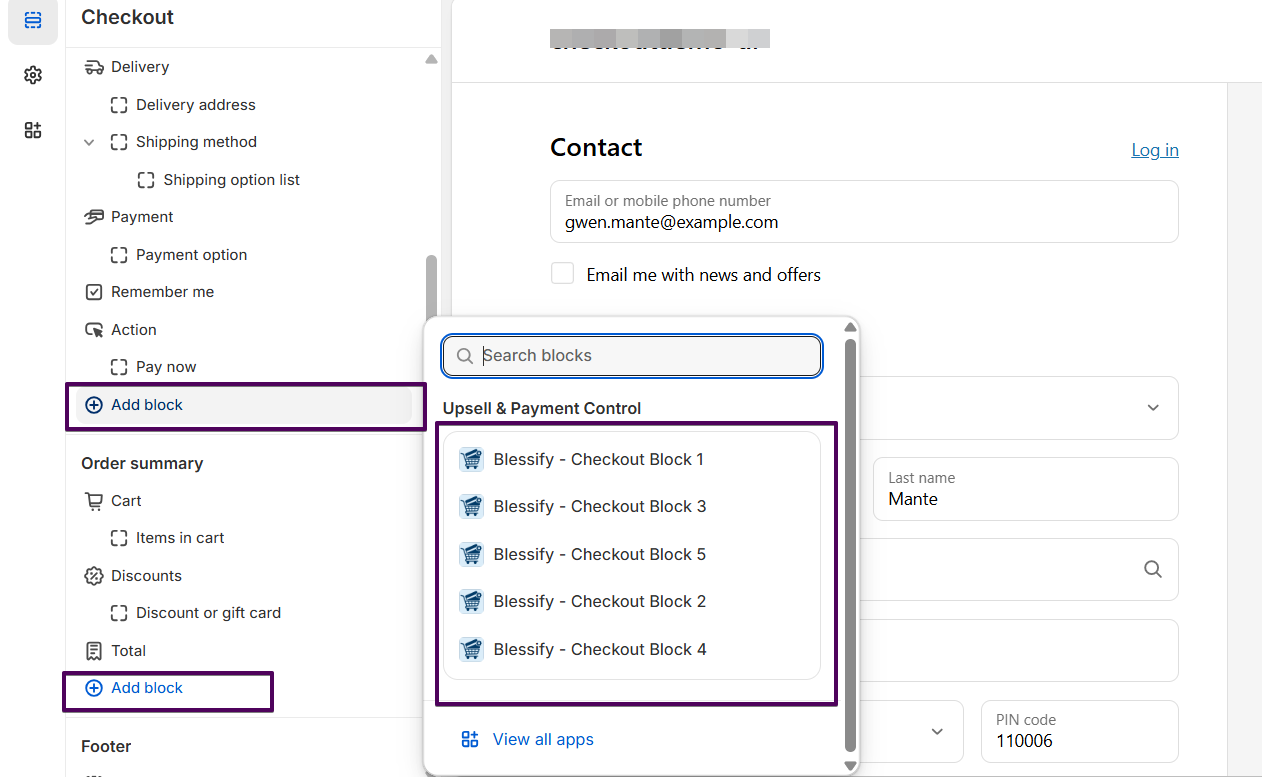
You can display up to 5 upsell offers on the checkout page. Each upsell offer is added as an app block, and you can place them in different positions on the page.
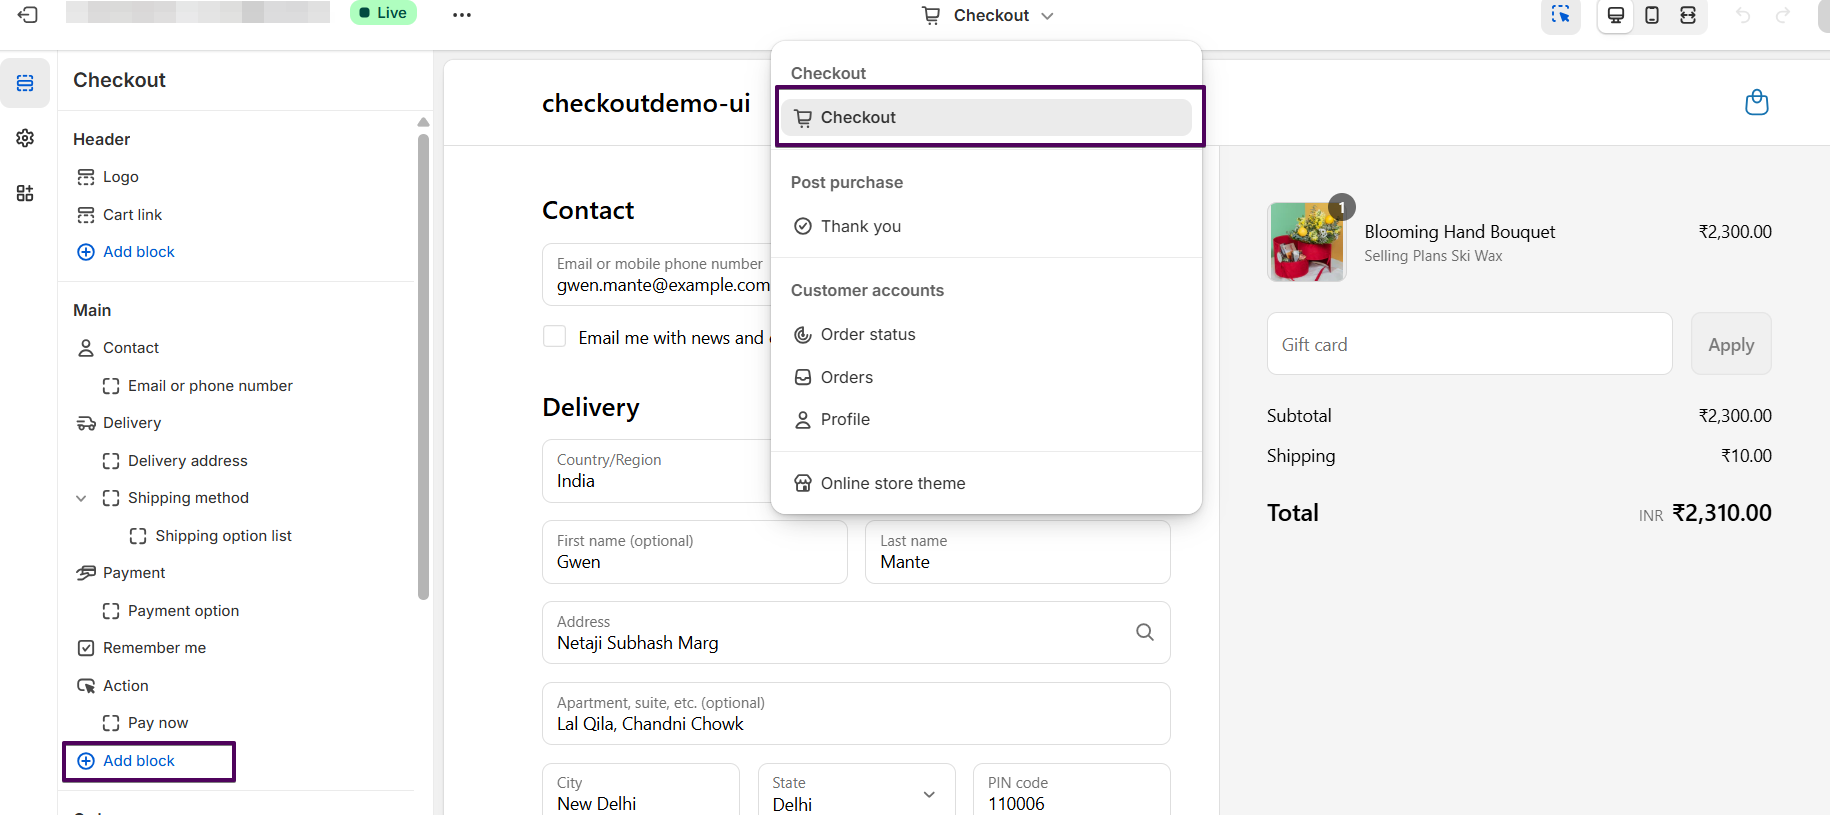
  • Open the Theme Editor.
  • Select Checkout and Customer Accounts.

    Checkout section in theme editor
  • Click Add Block and choose any of the following: Blessify – Checkout Block 1 to Blessify – Checkout Block 5.

    Adding app block in theme editor
  • Save your changes.
  • Watch this quick demo:

Understanding Slots and Blocks: Each checkout block in the Theme Editor is linked to a specific slot in the app. For example, Blessify – Checkout Block 1 is mapped to Slot 1 in the app.
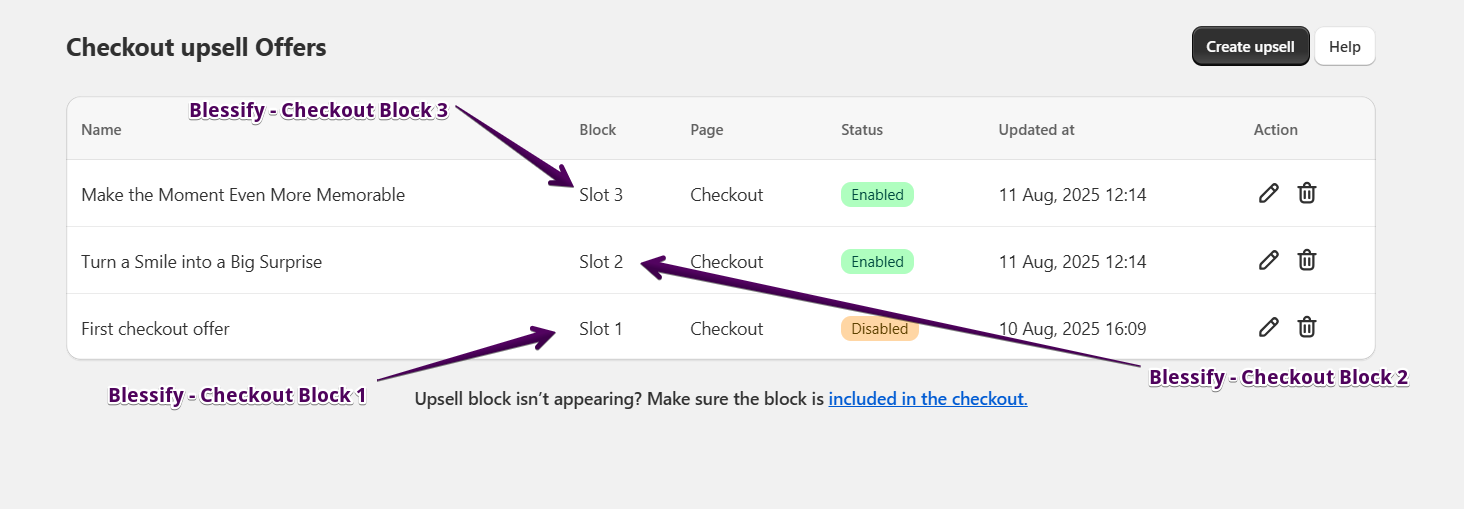
  • Checkout – Slot 1 → Blessify – Checkout Block 1
  • Checkout – Slot 2 → Blessify – Checkout Block 2
  • Checkout – Slot 3 → Blessify – Checkout Block 3
  • Checkout – Slot 4 → Blessify – Checkout Block 4
  • Checkout – Slot 5 → Blessify – Checkout Block 5
Slot to Block mapping

Editor Settings for customer order status page

You can display up to 5 upsell offers on the customer order status page. Each upsell offer is added as an app block, and you can place them in different positions on the page.
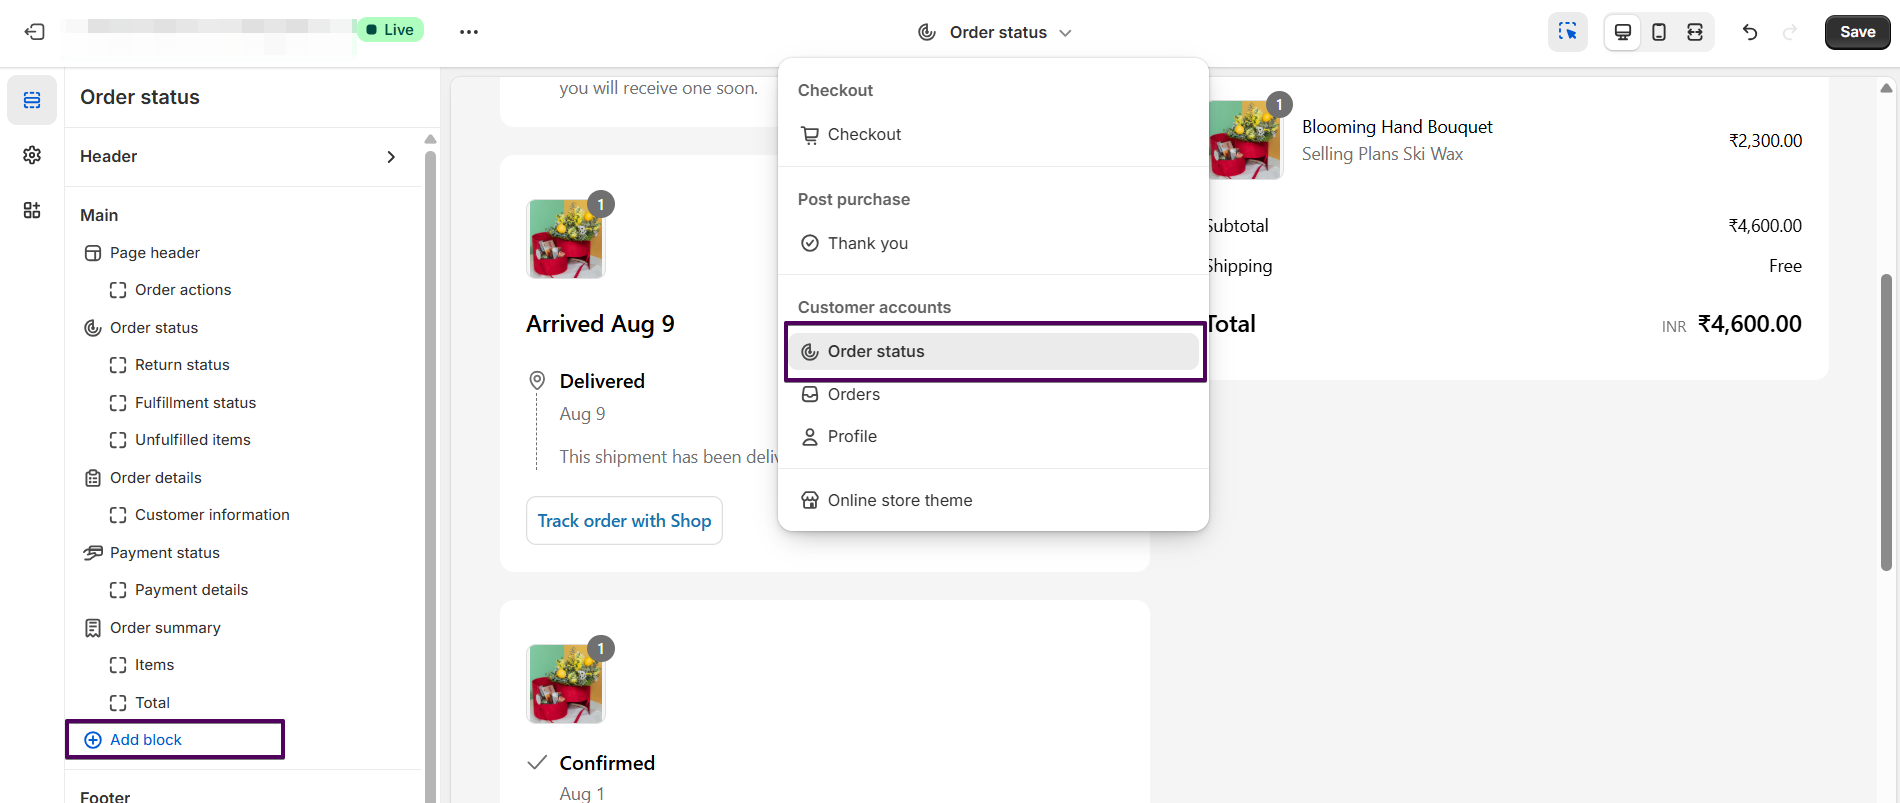
  • Open the Theme Editor.
  • Select Checkout and Customer Accounts.

    Checkout section in theme editor
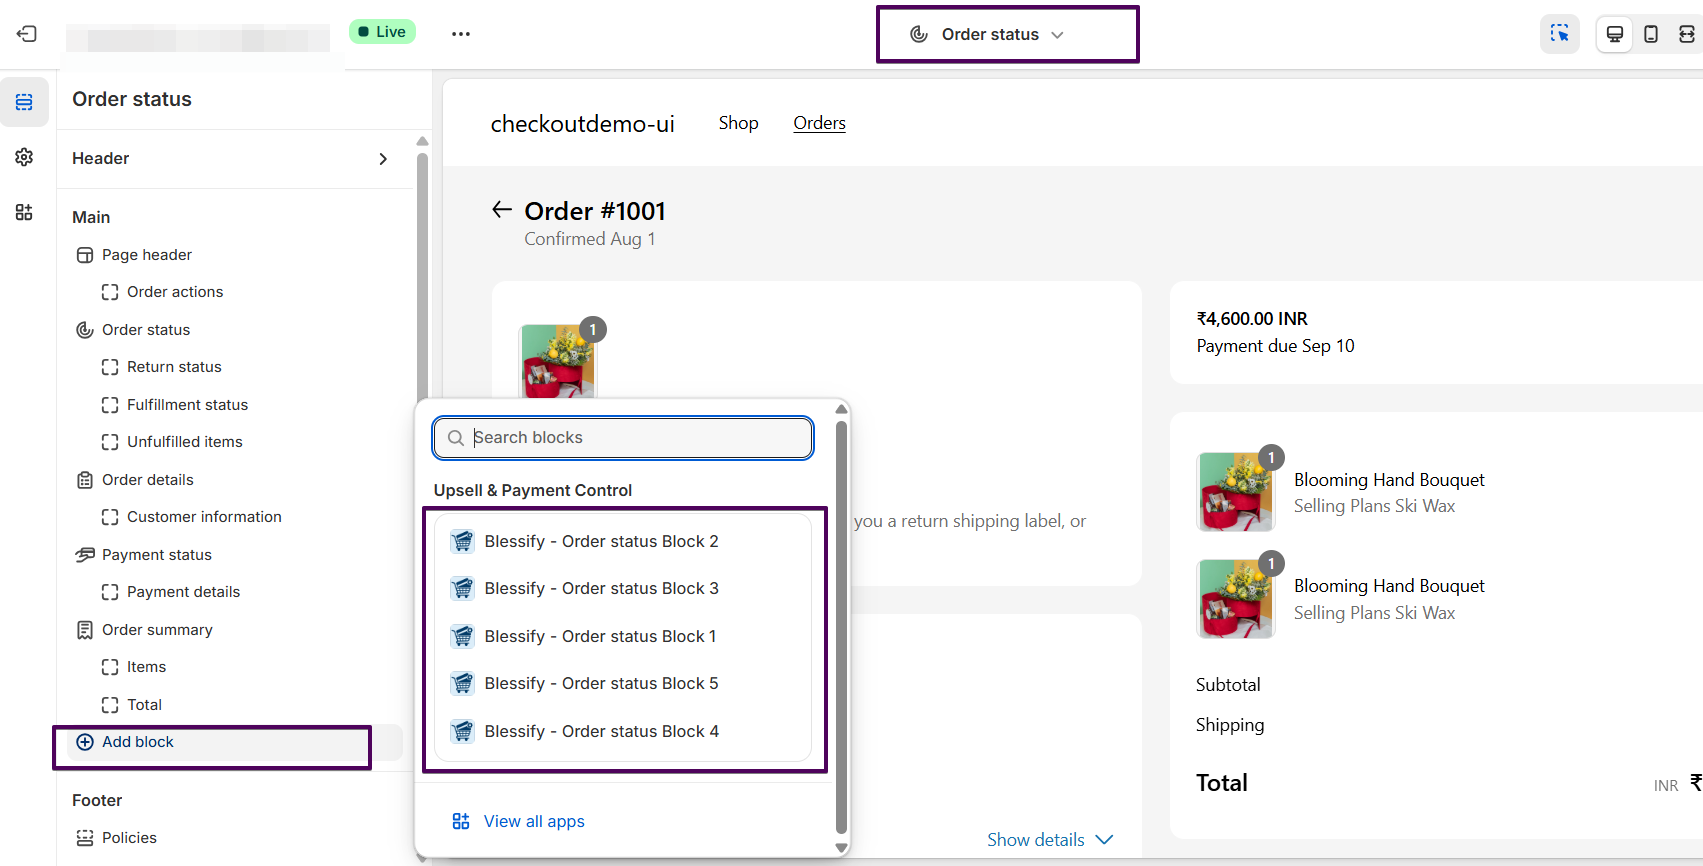
  • Click Add Block and choose any of the following: Blessify – Order status Block 1 to Blessify – Order status Block 5.

    Adding app block in theme editor
  • Save your changes.
  • Watch this quick demo:

Understanding Slots and Blocks: Each checkout block in the Theme Editor is linked to a specific slot in the app. For example, Blessify – Order status Block 1 is mapped to Slot 1 in the app.
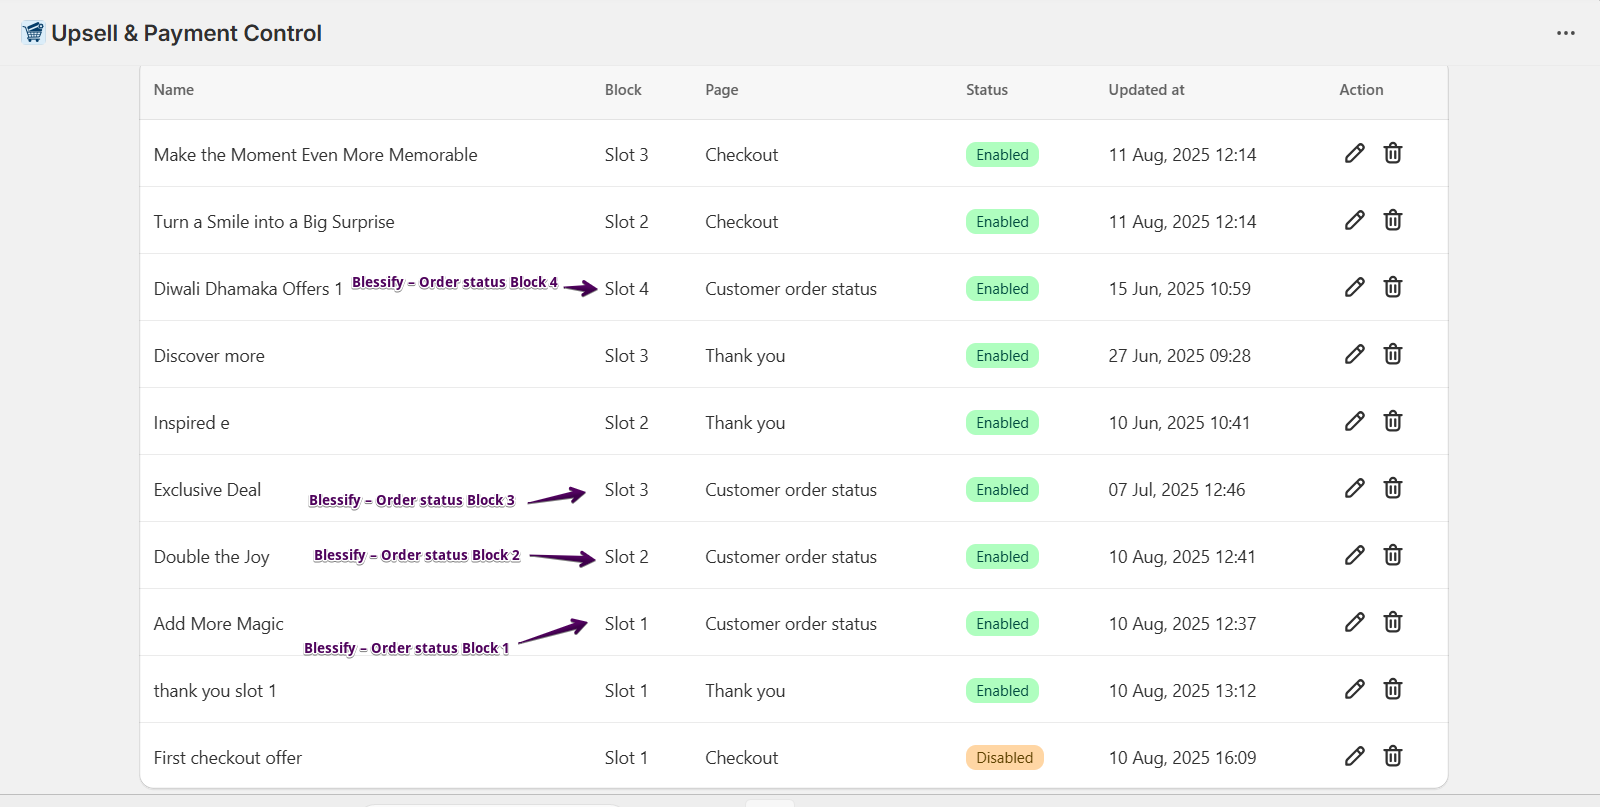
  • Customer order status – Slot 1 → Blessify – Order status Block 1
  • Customer order status – Slot 2 → Blessify – Order status Block 2
  • Customer order status – Slot 3 → Blessify – Order status Block 3
  • Customer order status – Slot 4 → Blessify – Order status Block 4
  • Customer order status – Slot 5 → Blessify – Order status Block 5
Slot to Block mapping

Editor Settings for thank you page

You can display up to 5 upsell offers on the thank you page. Each upsell offer is added as an app block, and you can place them in different positions on the page.
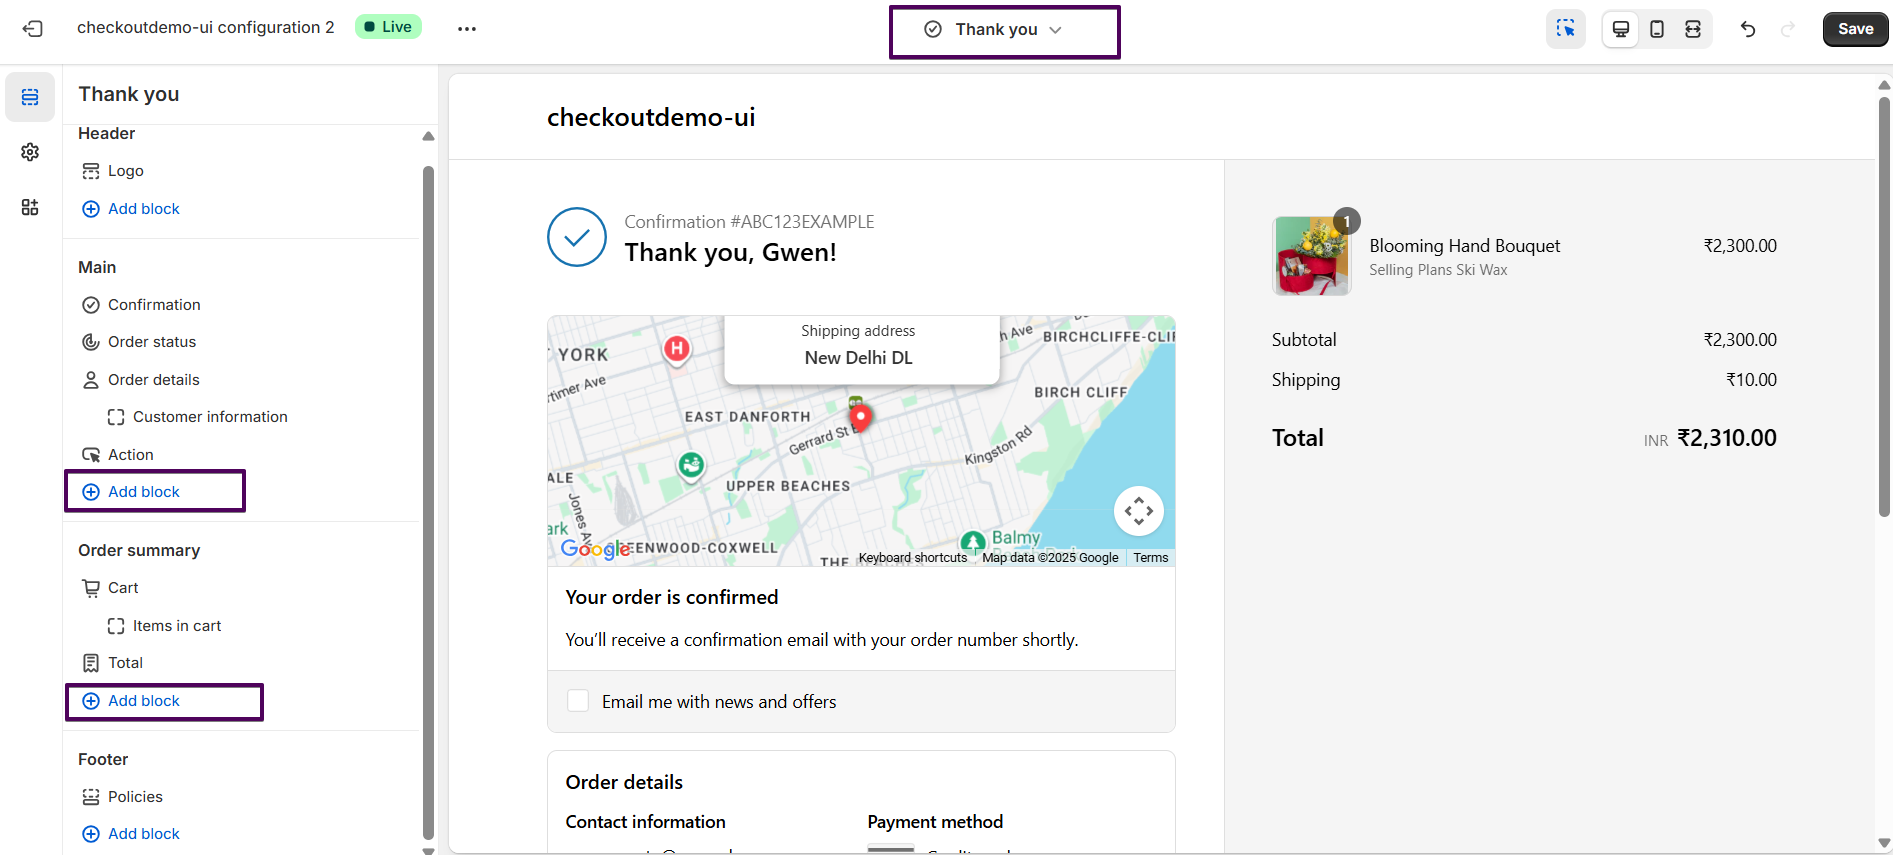
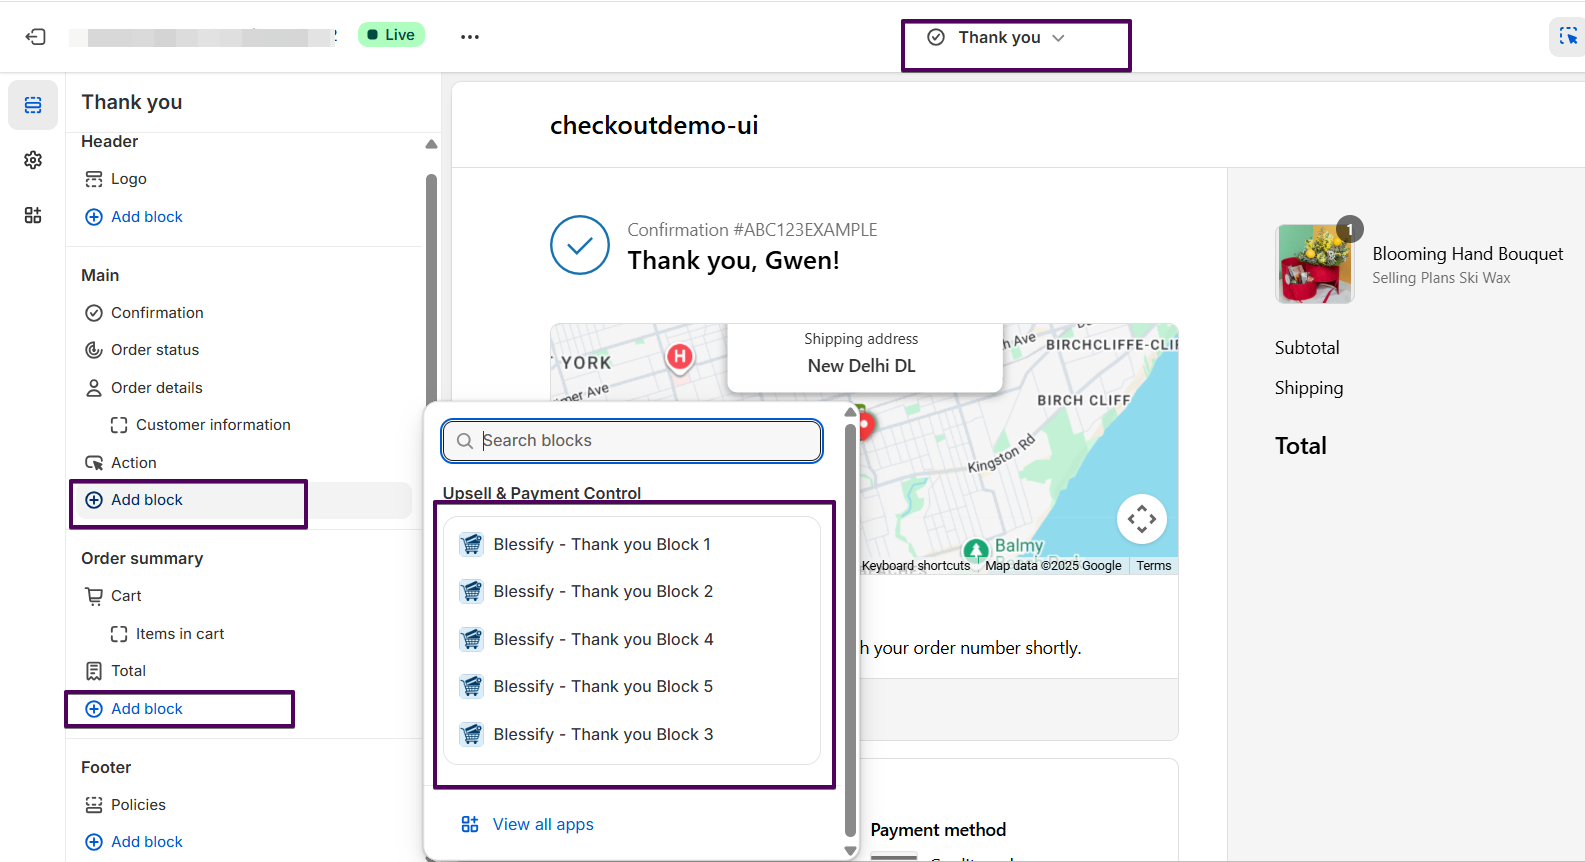
  • Open the Theme Editor.
  • Select Checkout and Customer Accounts.

    Checkout section in theme editor
  • Click Add Block and choose any of the following: Blessify – Thank you Block 1 to Blessify – Thank you Block 5.

    Adding app block in theme editor
  • Save your changes.
  • Watch this quick demo:

Understanding Slots and Blocks: Each checkout block in the Theme Editor is linked to a specific slot in the app. For example, Blessify – Thank you Block 1 is mapped to Slot 1 in the app.
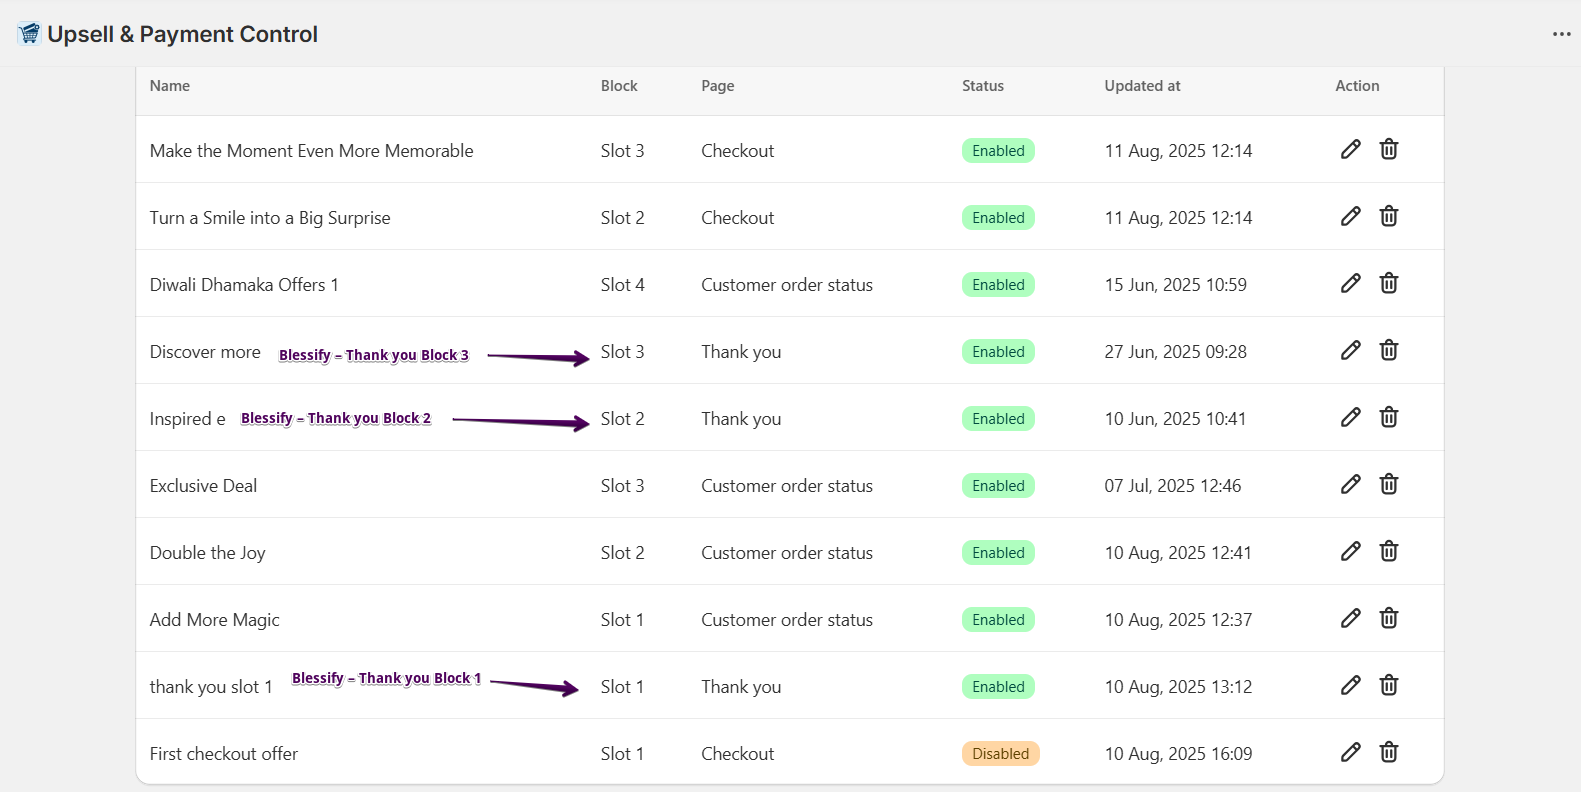
  • Thank you – Slot 1 → Blessify – Thank you Block 1
  • Thank you – Slot 2 → Blessify – Thank you Block 2
  • Thank you – Slot 3 → Blessify – Thank you Block 3
  • Thank you – Slot 4 → Blessify – Thank you Block 4
  • Thank you – Slot 5 → Blessify – Thank you Block 5
Slot to Block mapping

How to Add Payment customization

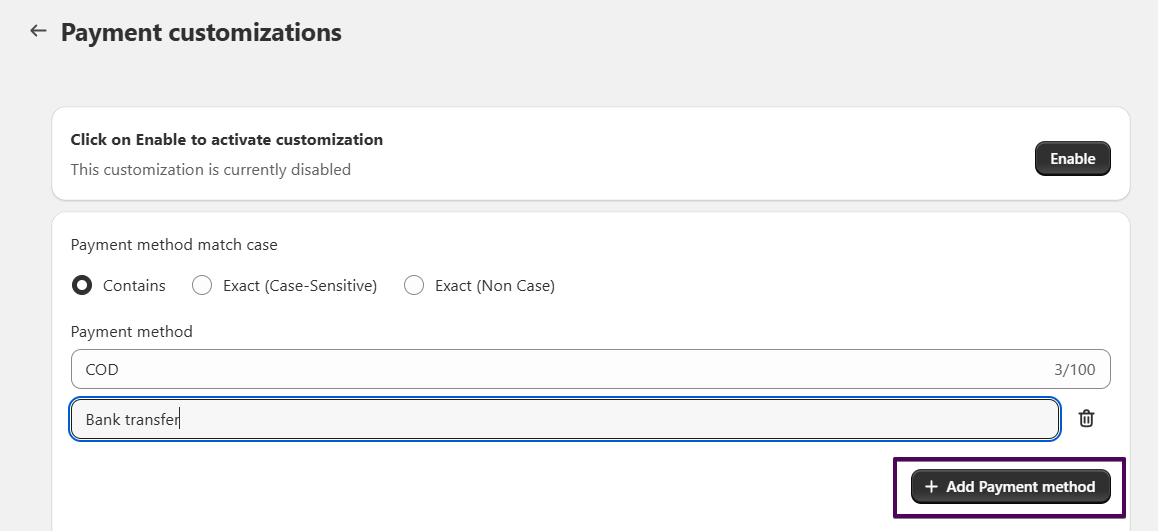
  • Go to App → Payment customizationCreate customization.
  • Click Enable to activate the customization.
  • Under Payment method match case, choose how the payment method name should be matched:
    • Contains – Matches if the payment method name contains the entered text.
    • Exact (Case-Sensitive) – Matches if the payment method name exactly matches the entered text with the same letter case.
    • Exact (Non Case) – Matches if the payment method name exactly matches the entered text regardless of case.
  • Before add payment method, make sure payment method name from store admin → Settigns → Payments
  • Enter the Payment method name you want to match (e.g., COD).
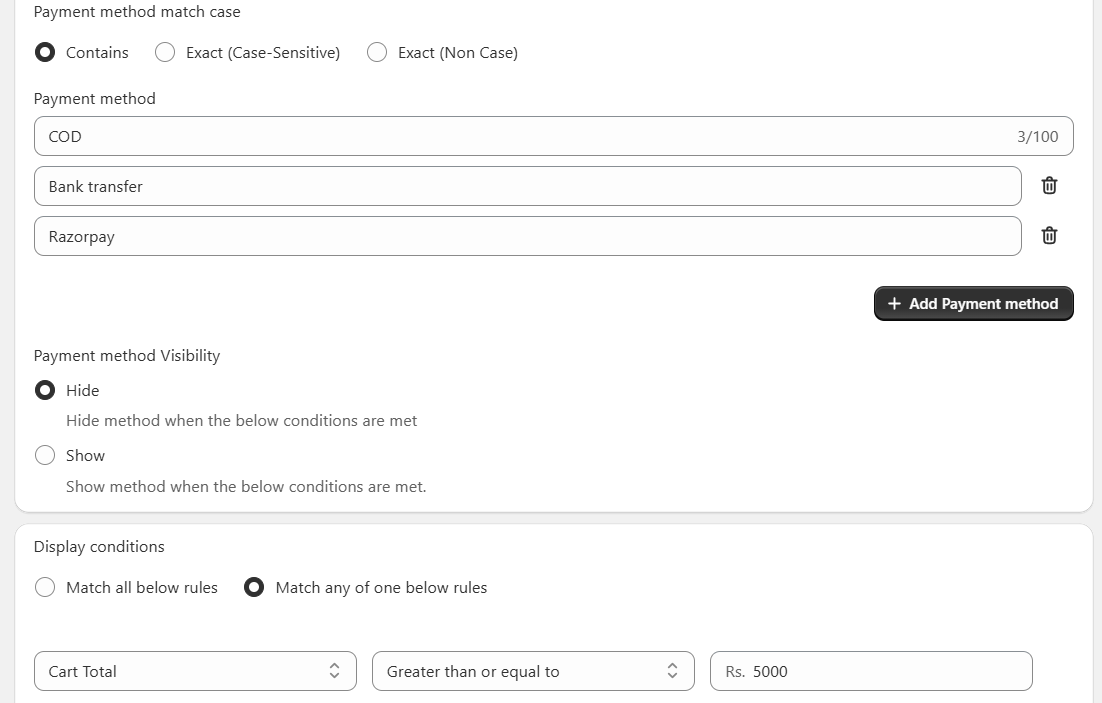
  • Click Add Payment method to add more payment methods to the list.
  • Under Payment method Visibility, choose:
    • Hide – Hide the selected payment methods when conditions are met.
    • Show – Show the selected payment methods only when conditions are met.

How to add rule

  • You can create multiple rules to control when the selected payment method is hidden or shown.
  • What rules do: Rules decide when a payment method will be visible or hidden based on the conditions you set.
  • Multiple rules: You can create more than one rule.
  • Rule logic:
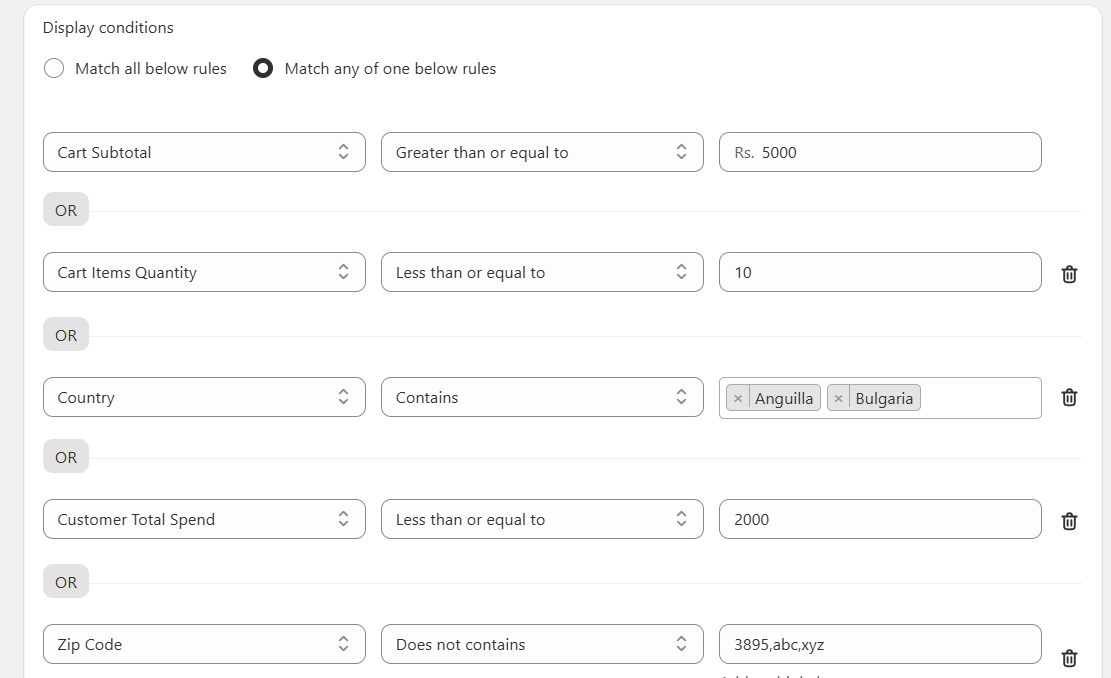
    • Match all below rules – All conditions in all rules must be true for the customization to apply (AND logic).
    • Match any one below rules – If any single condition is true, the customization will apply (OR logic).
  • Conditions inside a rule: Each condition can check for different order, customer, or location attributes like cart total, weight, quantity, country, zip code, etc.
  • Condition logic: Conditions inside the same customization follow the logic you select at the top (All or Any).
  • Example with "Match any one":
    • Condition 1: Cart subtotal ≥ ₹5000
    • Condition 2: Total weight ≤ 2 kg
    • This means: "If cart subtotal ≥ ₹5000 OR total weight ≤ 2 kg, hide/show the selected payment method."
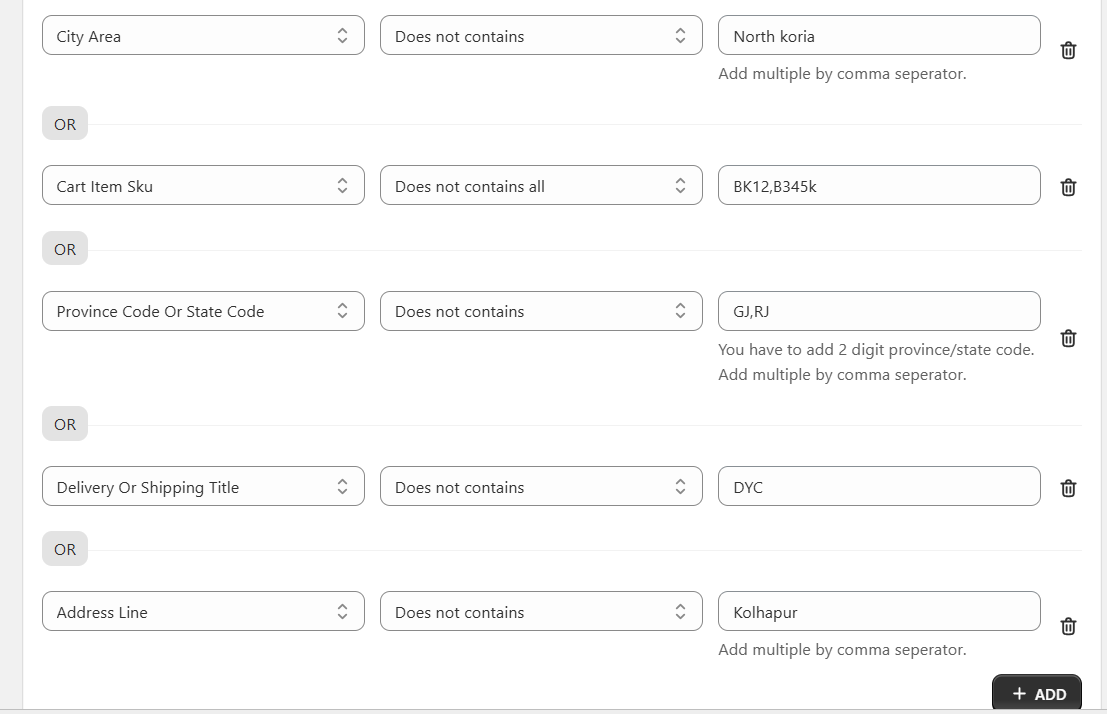
  • Available condition types:
    • Cart Total
    • Cart Subtotal
    • Total Weight
    • Cart Items Quantity
    • Cart Item Sku
    • Country
    • Province Code Or State Code
    • Zip Code
    • City Area
    • Address Line
    • Customer Total Spend
    • Delivery Or Shipping Title
  • Click the + ADD button to add more conditions.


  • Save the customization after setting up your rules.

Adding Multiple Payment Methods

  • You can add one or more payment methods to match.
  • Each payment method entered will be checked according to the selected match type (Contains, Exact Case-Sensitive, Exact Non Case).
  • Click + Add Payment method to add another payment method field.
  • Use separate fields for each payment method name (e.g., COD, Bank transfer, Razorpay).
  • To remove a payment method, click the delete icon next to it.
  • All added payment methods will be applied with the same visibility rule (Hide or Show) and conditions you set below.

Hide/Show Payment Methods Based on Cart Total

  • Select Cart Total from the condition dropdown in the Display conditions section.
  • Choose the comparison type:
    • Greater than or equal to – Apply the rule if the cart total is equal to or more than the set value.
    • Less than or equal to – Apply the rule if the cart total is equal to or less than the set value.
  • Enter the cart total value (e.g., ₹5000) in the amount field.
  • Under Payment method Visibility, choose:
    • Hide – The payment method will be hidden when the condition is met.
    • Show – The payment method will only be shown when the condition is met.
  • You can combine this with other conditions for more control, using Match all below rules (AND logic) or Match any of one below rules (OR logic).
  • Click Save to apply the customization.

Hide/Show Payment Methods Based on Location

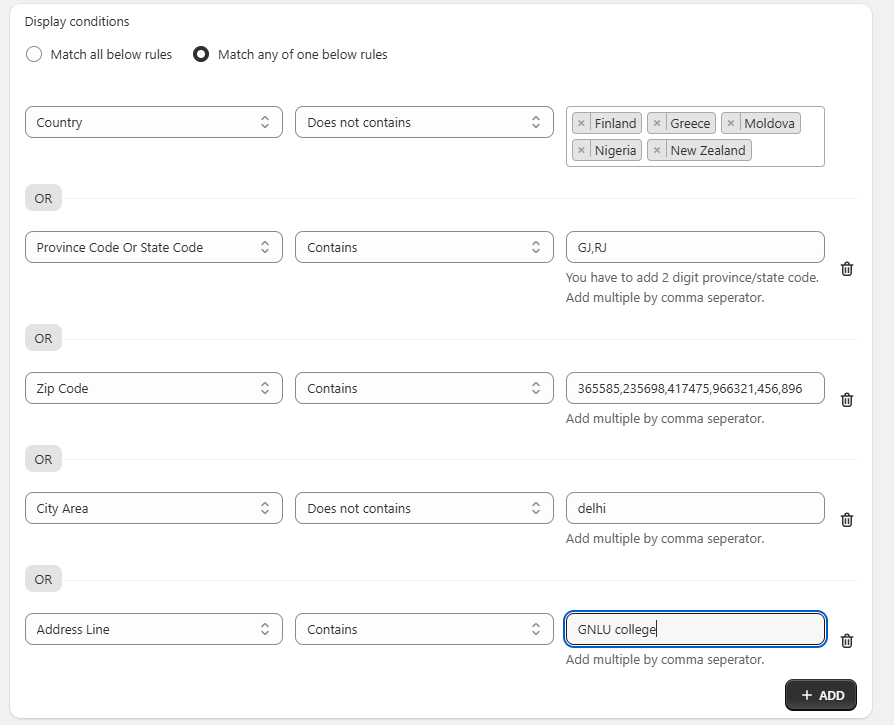
  • Select one or more location-based conditions in the Display conditions section.
  • Available location condition types:
    • Country – Match based on the customer’s country.
    • Province Code or State Code – Match using 2-digit province/state codes (e.g., GJ, RJ).
    • Zip Code – Match by postal code; enter multiple separated by commas.
    • City Area – Match based on the city name or area; enter multiple separated by commas.
    • Address Line – Match text from the street address field.
  • Choose a comparison type for each condition:
    • Contains – Matches if the entered value is part of the customer’s location.
    • Does not contain – Matches if the entered value is not part of the location.
  • Enter one or more values, separated by commas (e.g., GJ,RJ for states, or 365585,456 for zip codes).
  • Under Payment method Visibility, select:
    • Hide – The payment method will be hidden when the condition is met.
    • Show – The payment method will only be shown when the condition is met.
  • Use Match all below rules (AND logic) to apply multiple location checks together, or Match any of one below rules (OR logic) to apply if any location condition matches.
  • Click Save to apply the customization.

Hide/Show Payment Methods Based on Shipping Method

You can set an extra charge for Cash on Delivery based on the shipping method. Create a shipping method specifically for COD customers, and configure it so that the COD payment option is shown only when this shipping method is selected.

  • Select Delivery or Shipping Title from the condition dropdown in the Display conditions section.
  • Choose a comparison type:
    • Contains – Matches if the shipping method title includes the entered text.
    • Does not contain – Matches if the shipping method title does not include the entered text.
  • Enter the keyword(s) that match the shipping method title shown at checkout (e.g., Standard, Express, 7 to days shipping).
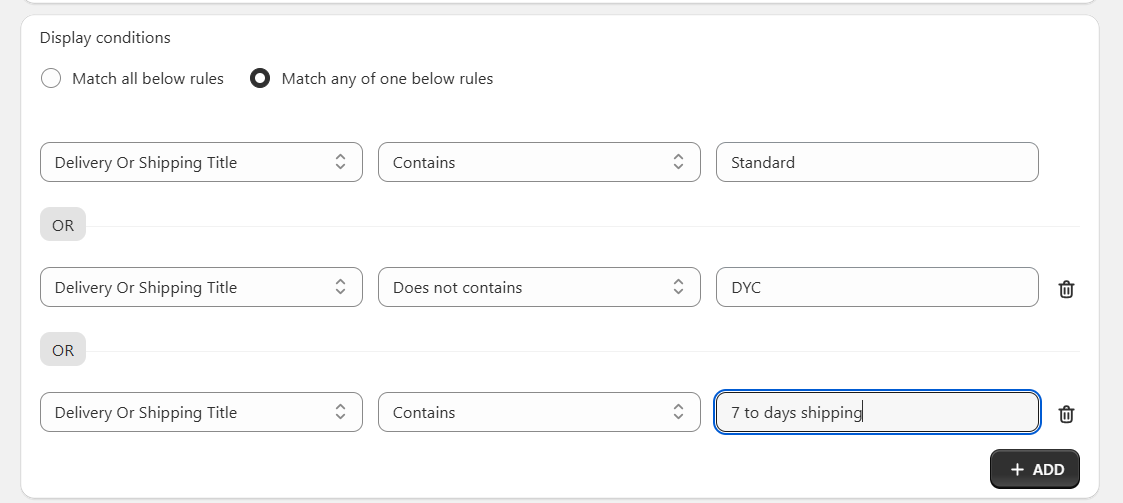
  • You can add multiple conditions with different keywords for more flexibility (use + ADD to add more).
  • Use Match all below rules (AND logic) to require all shipping conditions to be true, or Match any of one below rules (OR logic) to trigger if any shipping condition matches.
  • Under Payment method Visibility, choose:
    • Hide – Hide the payment method when the shipping method matches the condition.
    • Show – Show the payment method only when the shipping method matches the condition.
  • Click Save to apply the customization.

    Verify Payment Method Customization

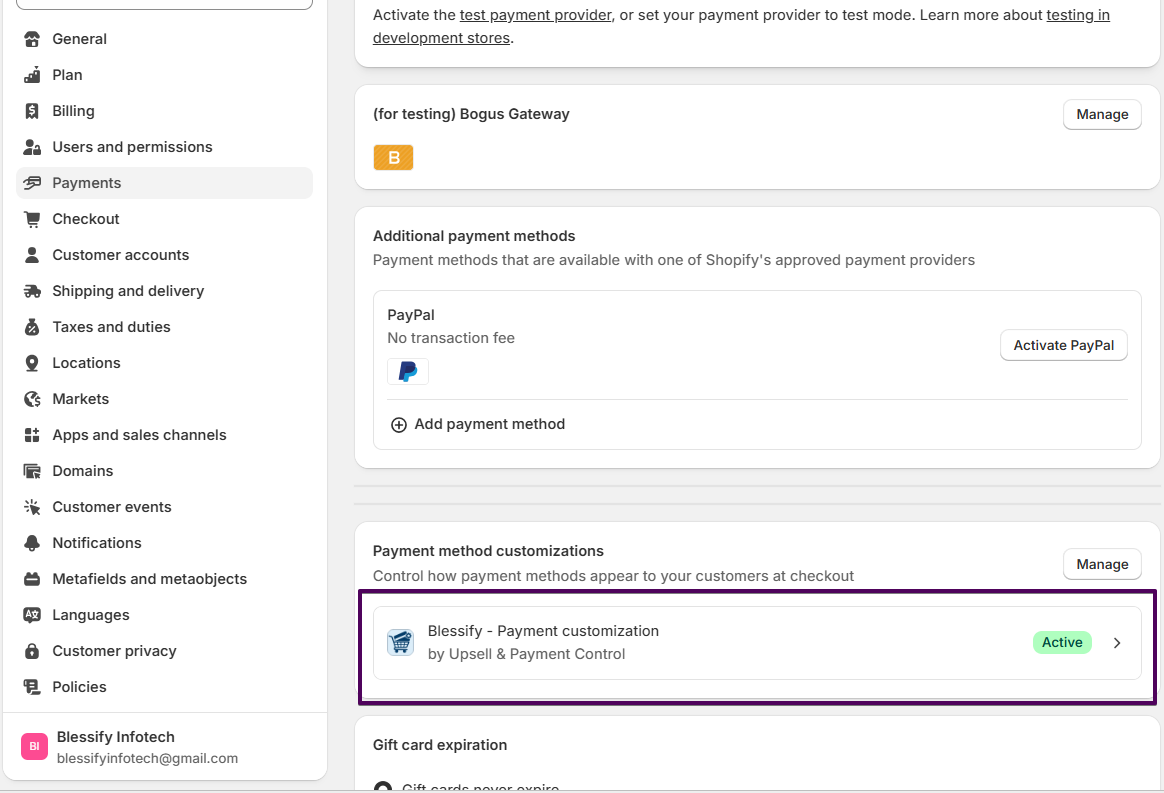
  • In your Shopify admin, go to Settings > Payments
  • Scroll down to the Payment Method Customizations section
  • Ensure "Blessify - Payment customization" is marked as Active

Hide payment method based on cart total or country


Extra charge for Cash on Delivery

Priority Rules

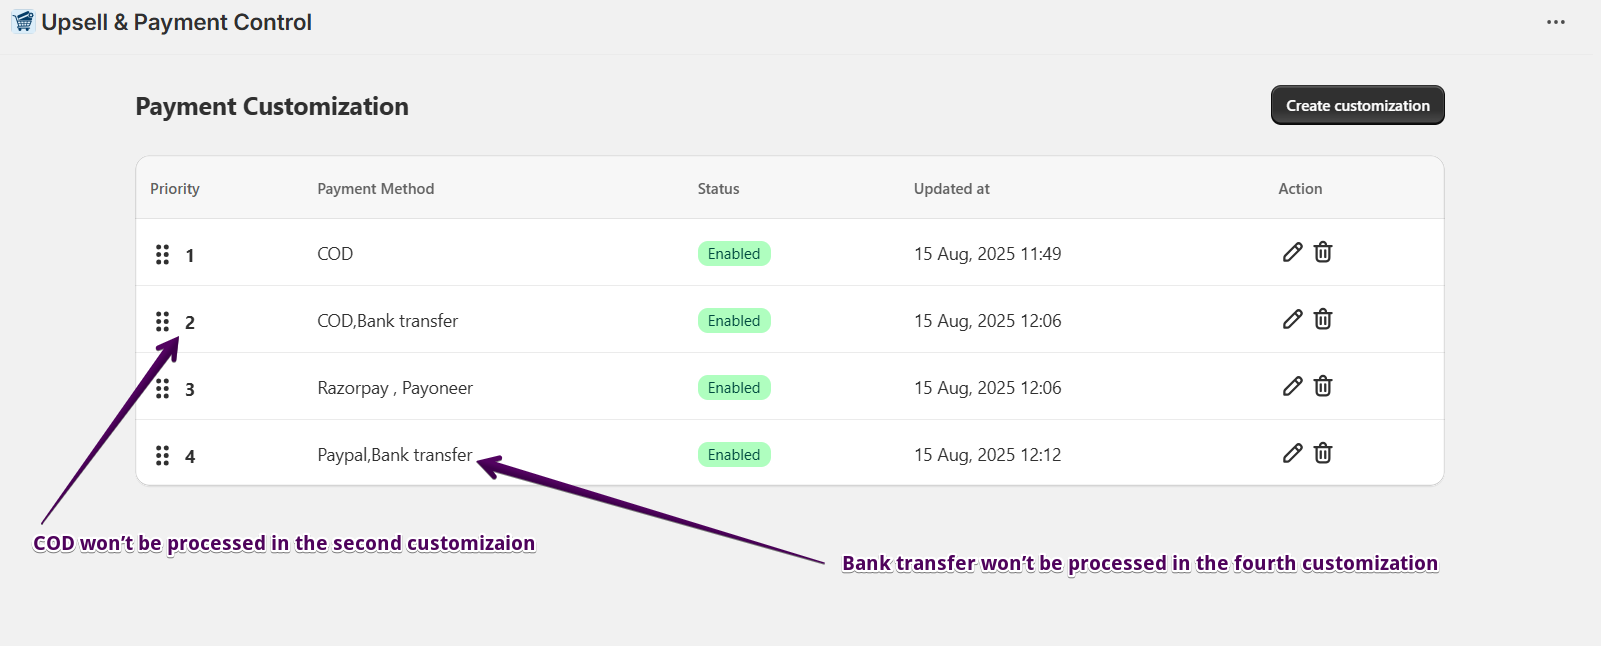
  • Rules are processed from top to bottom, starting with Priority 1.
  • If a payment method matches in a higher priority, it will not be checked in lower priorities.
  • Example: If COD is matched in Priority 1, any rule with COD in Priority 2 or below will be ignored.
  • Place your most important rules in higher priorities.

Need Help?

Facing any issue, contact us now we will help you for your problem.

Reach us Now

Please drop us mail on blessifyinfotech@gmail.com, we will contact you soon.